AdSense has finally released the Offerwall to the public!
If you’re an overseas publisher who somehow landed on this article, you probably just saw the Offerwall pop up on this blog, right? lol
Fun fact: this blog was actually one of the sites that got early access to the Offerwall in Japan.
(Yes, I know — just a random Japanese housewife blogger. But the early access part is true, I promise.)
So in this article, a Japanese blogger who has been using the AdSense Offerwall since February is sharing real configuration examples for fellow publishers abroad.
If you’re staring at the Offerwall thinking,“What on earth is this!?” then you’re in the right place.
Enjoy the deep dive.
↓↓It’s a Japanese article, but feel free to read it if you’d like.
AdSense Offerwall as an Alternative to Targeted Advertising
In Japan, cookie regulations aren’t actually that strict yet.
(We’re often called a “digital late‑comer,” so please be kind.)
But we do have ODPR and CCPA‑like rules, and more importantly, targeted advertising has been criticized globally for years.
That’s why Google seems to be positioning the Offerwall as an alternative model to traditional targeting.
Japan’s culture is unique, and the blogging scene is no exception — in a funny way.
But the “internet neighborhood” here is relatively peaceful.
Because of that, it’s said that Google chose a small group of Japanese publishers to test the Offerwall before the global rollout.
I’ve written about this topic in more detail on my Japanese blog.
The article is in Japanese, but feel free to use your browser’s translation feature if you’re curious.

My Actual AdSense Offerwall Settings (Real Examples)
From here, I’ll walk you through the exact Offerwall settings I’m using on my blog.
First, an important note: The AdSense Offerwall does not appear automatically!
You have to create your own Offerwall message in the AdSense dashboard, adjust the display settings, and then hit the Publish button.
Only after that will the Offerwall actually appear.
So don’t worry — it will never “show up out of nowhere.”
If anything, the more common issue is: “I set it up… but it’s not showing!” lol
Now, let’s go through the actual setup steps.
Step 1 — AdSense Dashboard → Privacy & Messaging
First, go to your AdSense dashboard and open the Privacy & Messaging section from the left‑hand menu.
Inside the Monetization category, you’ll find Offerwall.
Click it to access the Offerwall settings page.
You’ll be coming back to this “Privacy & Messaging” section whenever you want to update your Offerwall settings, so it’s helpful to remember where it is.
Note: In Japan, these settings aren’t taken very seriously yet, but if you’re an overseas publisher, please make sure to configure your ODPR and CCPA settings properly. Otherwise, you may lose revenue from users in the EU and California. It’s important — don’t skip it!
Step 2 — Adjust Your Display Settings
Once you’re on the Offerwall settings page, click the blue “Create message” button.
The left panel shows a live preview of your Offerwall, while the right panel is where you configure all the detailed settings.
From here, you’ll customize the message text, choose what to offer users, and adjust how and where the Offerwall appears.
Site
Enter the URL of your blog here.
Page Inclusion & Exclusion
This is where you choose which pages should display the Offerwall and which ones should be excluded.
Important: Any exclusions you set here will override optimization.
So if you want to exclude specific pages, this is the place to do it.
You can exclude up to five URLs.
Default Language
Set the primary language of your blog here.
Metering (Display Frequency Limits)
This setting controls how many times the Offerwall will be shown to a user.
You can adjust this in each ad’s settings, but the Offerwall also has its own metering options here.
If it says “Optimized”, that means Google will automatically determine the best display frequency for your site.
User Options (Types of Offers)
Here you choose what kind of offer you want to present to users.
Currently, AdSense Offerwall supports the following three options:
● Rewarded Ad (Watch‑to‑Unlock)
Users watch an ad, and in return they get free access to your blog for a certain period.
On my blog, watching one ad unlocks 24 hours of free access.
● Email Collection
Users provide their email address in exchange for temporary free access.
This allows you to build a mailing list or send promotions, but it’s a much higher‑effort option to manage.
● Close (Skippable Offer)
This option is useful if you don’t want to force ads on your readers.
Users can skip the Offerwall instead of interacting with it.
Example: If you set the skip limit to 3 times, → after 3 skips, the Offerwall will stop appearing.
Offerwall Optimization
This feature lets AdSense automatically decide which pages should show the Offerwall without hurting user experience — and where it can generate the most revenue.
If you don’t want to fine‑tune everything manually, keeping this turned on is totally fine.
However, keep in mind: If Google decides a page “doesn’t need the Offerwall,” it simply won’t show up — even if you expected it to. lol
Step 3 — Customize Your Rewarded Ad Message
In the center of the settings page, you’ll see a preview of how your Offerwall will appear to users.
Each section has an Edit button, and you can freely customize the text.
I wanted to run my Offerwall in a kind of “support your favorite creator” style, so I changed the message to something like: “If you’d like to support me, please watch an ad!”
You can also adjust things like font size and layout from the Style tab on the right.
Feel free to customize it however you like.
Logo Settings (via the “Site” Link)
To set your logo, use the “Site” link on the right side of the message creation screen.
You’ll see your blog’s URL displayed as a clickable link in the right‑hand panel.
Click that URL, and it will take you to the page where you can upload your logo image.
Once you upload your logo here, it will appear at the top of your Offerwall.
Step 4 — Publish Your Offerwall After Customizing
Once you’ve finished adjusting your display settings and customizing the message text, click the “Publish” button in the top‑right corner.
It may take a little time for the changes to propagate, but the Offerwall will eventually appear on your blog.
If you still want to make adjustments, be sure to click “Save draft” — otherwise your edits will be lost.
(Speaking from experience… I had to redo everything a few times. lol)
Here’s What the Offerwall Looks Like on My Blog
Before reading this article, you probably saw the Offerwall on my blog already.
Here’s the exact version I’m using:
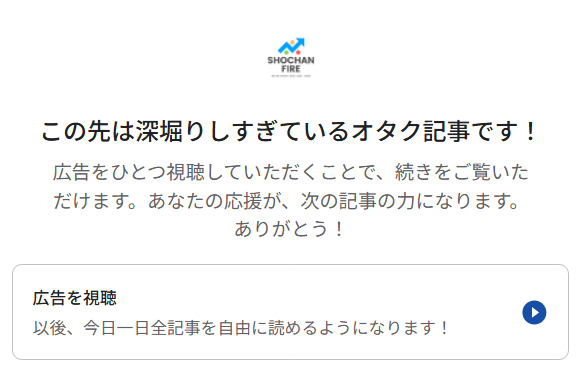
“This article goes deep into otaku territory! If you’d like to keep reading, please watch one ad. Your support helps me create the next article. Thank you!”
“Watch Ad After watching, you’ll have free access to all articles for the rest of the day.”
I’m the kind of creator who wants to use the AdSense Offerwall not just as a monetization tool, but also as a form of “support your favorite creator” culture.
A slightly obsessive otaku, basically. lol
So that’s why my message is written this way.
My Experience Using Offerwall ーSurprisingly Positive
In Japan, Offerwalls actually have a pretty bad reputation.
And honestly, I think the main reason is simple:
Too many publishers use them in a greedy, annoying way.
Every time the page changes, it’s “Watch an ad.”
You click “Read more on the blog,” and when you arrive… again, “Watch an ad.”
If it were a mobile game where watching ads gives you extra lives, or a manga app where ads unlock the next chapter, that’s fine.
But for a regular blogger like me? It just feels excessive.
And here’s the truth: If I find that kind of ad experience annoying, my readers will definitely find it annoying too.
So it’s important to run Offerwalls in a way that doesn’t ruin the user experience.
Our Offerwall Policy on This Blog
I’m a slightly obsessive otaku who doesn’t want my blog to become “ad‑driven,” but I still want to balance things with the business side.
So here’s the approach I’ve been using:
- Exclude Offerwall on new posts and important informational articles
- Enable Offerwall on deep‑dive otaku content and business‑related posts
- After watching one ad, readers get 24 hours of free access
This is my attempt at a “user‑experience‑friendly Offerwall strategy designed by an otaku.”
And thankfully, readers seem to be responding to it pretty positively. lol
Valuable Information Deserves a Fair Exchange
When you use an Offerwall, the real question becomes:
“Is this article valuable enough that someone would watch an ad to read it?”
Thinking about the value of each article this way has helped me realize that:
- The overall value of the blog increases
- Revenue naturally improves
- You develop a stronger sense of running your own media as a business
In other words, it’s a win‑win‑win.
To My Fellow Bloggers Around the World Who Want to Try Offerwall
Offerwall can be an incredibly useful tool when configured thoughtfully — it lets you increase revenue without hurting the user experience.
The idea that “ads are always annoying” isn’t true.
With the right approach, you can completely change how readers feel about them.
Let’s use Offerwall responsibly and help improve its reputation on a global scale — together.

Bonus: To Everyone Around the World Wondering “What isthis blog?” — Hello!
I’m a housewife living in Hokkaido, Japan — and I’m not an engineer or anything fancy. lol
I write about everyday thoughts, things that catch my interest, movies I love, food I enjoy, and little moments from parenting.
Just a simple lifestyle blogger.
But I also hope more people around the world can discover the charm of Japan through my posts.
So if you’re here for the first time, I’d be happy if you explored a bit.

I’ve only just started, but I also run a quiet, radio‑style monologue channel on YouTube, and I’m creating some Japanese‑learning content too.
Feel free to check them out if you’re curious.
I hope we meet again somewhere on the internet.
コメント